Contents
The Art of Sushi: A Brief History and Cultural Significance
Sushi, one of the most popular Japanese dishes, has evolved over centuries from being a street food to becoming a sophisticated culinary art form. Originally created in Southeast Asia as a way of preserving fish, sushi was introduced to Japan in the 8th century as a luxury item consumed by aristocrats. The dish then spread to the masses and became an affordable option for people who wanted a quick snack.
Today, sushi has become an international phenomenon with countless variations enjoyed by foodies all around the world. Sushi is not just a dish but also represents Japanese culture and tradition.
The preparation of sushi is viewed as an art form where chefs need years of training before they can master the skill of creating perfectly seasoned rice and delicately sliced fish. In Japan, sushi chefs are considered artists who put their soul into every roll they make.
Every element in the dish represents something significant – the rice symbolizes wisdom while vinegar represents strength and longevity. The use of fresh fish reflects respect for nature while wasabi (Japanese horseradish) represents purity.
Why Making Your Own Sushi is Fun and Rewarding
Making your own sushi might sound intimidating at first but it’s actually quite easy once you get started. Not only is it fun and rewarding, but it’s also healthier than buying pre-made sushi rolls that may contain additives or preservatives.
Making your own sushi allows you to personalize your roll with ingredients that you love while saving money in the process. One of the best things about making your own sushi is that you can experiment with different types of fillings to create unique flavor combinations that suit your taste buds.
From avocado to crab meat to mango, there are endless possibilities for fillings that can be incorporated into your rolls. Making your own sushi can also be a great social activity where you can invite friends and family over to share in the excitement of creating your own delicious rolls.
With a few basic ingredients and tools, you can turn your kitchen into a sushi-making workshop and have a blast while doing it. So, grab some rice, nori, fillings, and get ready to roll!
Ingredients and Equipment
List of Essential Ingredients
Sushi has a reputation for being complicated and expensive, but in reality, it’s all about using quality ingredients. The essential ingredients are sushi rice, nori (dried seaweed), and fillings. Sushi rice is short-grain rice that becomes sticky when cooked.
It’s important to use the right kind of rice to achieve the perfect texture for your sushi rolls. Nori is usually sold in sheets and can be found in most grocery stores or Asian markets.
As for fillings, you can use almost anything you like – from traditional raw fish to vegetables or even fruit. When shopping for ingredients, make sure to choose fresh produce and high-quality seafood if you’re using it as a filling.
If you’re not sure what fillings to try, some classic options include avocado, cucumber, crab meat, and eel. For those who want to add a little more flair to their sushi rolls, consider experimenting with mango or smoked salmon as well.
Recommended Equipment
In order to make your own sushi at home, there are some essential pieces of equipment that you will need. The first item on the list is a bamboo mat called a “makisu,” which is used for rolling the sushi rolls tightly together into the right shape. A sharp knife is also important for cutting through the delicate ingredients without crushing them.
Other recommended equipment includes a wooden spoon or paddle for mixing the cooked rice with vinegar and sugar; small bowls of water for dipping fingers in when working with sticky rice; plastic wrap; paper towels; and plastic gloves if desired. While these tools may seem overwhelming at first glance, they’re easy to find online or at your local Asian market – and they’ll make all the difference when it comes time to roll your own delicious sushi creations!
Preparing the Rice
Detailed instructions on how to cook sushi rice perfectly
Sushi rice is the foundation of any good sushi roll, and it’s essential to get it right. Start by rinsing the rice in cold water until the water runs clear.
This will remove excess starch and help prevent clumping. Next, add the rice and water to a pot in a two-to-one ratio (two cups of water for every one cup of rice).
Bring to a boil, then reduce heat to low and simmer for 18-20 minutes, or until all the water has been absorbed. Avoid lifting the lid while cooking, as this can disrupt the cooking process.
Once cooked, transfer the hot rice into a large bowl and let it cool for five minutes before seasoning with sushi vinegar. Sushi vinegar is made from a combination of rice vinegar, sugar, and salt.
For every cup of cooked rice, use two tablespoons of vinegar, one tablespoon of sugar, and half a teaspoon of salt. Mix well with a wooden spoon or spatula while fanning the rice to help it cool down faster.
Tips for seasoning the rice with vinegar and sugar
The key to perfectly seasoned sushi rice is getting just the right balance between sweet and sour flavors. If you prefer your sushi on the sweeter side, adjust accordingly by adding more sugar; likewise if you prefer a more tangy taste add more vinegar instead. Another important tip when preparing sushi rice is to avoid over-mixing or using metal utensils as this can damage delicate grains of cooked sushi rice creating undesirable clumps.
be mindful that freshly prepared sushi needs time for its flavors to meld together ideally resting for around 5 minutes after seasoning before adding your filling With these tips in mind combined with patience ,and attention to detail ,you can make delicious restaurant-style sushi at home!
Choosing Fillings
Suggestions for Classic Fillings
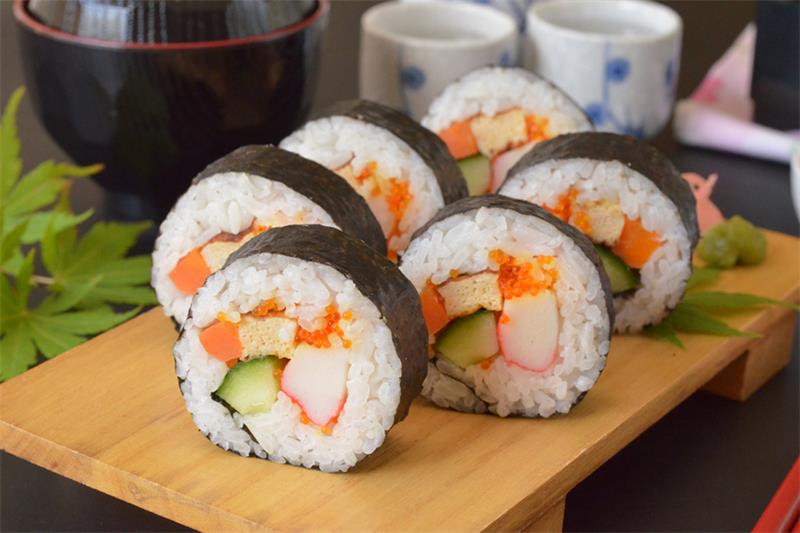
Choosing the right fillings is key to making delicious sushi rolls. Some classic, must-have fillings include avocado, cucumber, and crab meat.
Avocado is a popular choice as it adds a creamy texture and nutty flavor that pairs well with other ingredients. Cucumber provides a refreshing crunch that balances out heavier or richer fillings.
Crab meat, whether real or imitation, is another classic filling that brings seafood flavor and texture to your sushi roll. Other common fillings include carrots, bell peppers, and cream cheese.
If you’re looking for vegetarian options, you can also use tofu as a filling. Experiment with different combinations to find the perfect balance of flavors and textures.
Ideas for More Adventurous Fillings
If you want to get more creative with your sushi fillings, there are endless options to try! One of my personal favorites is mango – its sweetness pairs perfectly with savory ingredients like salmon or shrimp. Speaking of which, smoked salmon is another tasty option that adds a smoky depth of flavor.
You can also play around with different sauces or dressings as fillings – teriyaki sauce or spicy mayo add both flavor and moisture to your rolls. For those who like it spicy, consider using wasabi or sriracha sauce in your rolls.
Don’t be afraid to think outside the box when it comes to choosing your sushi fillings – some unexpected combinations might become new favorites! Just remember to balance out flavors and textures for the perfect bite every time.
Rolling Techniques
Step-by-Step Instructions on How to Roll Sushi Using a Bamboo Mat
Now that you have prepared the rice and chosen your fillings, it’s time to start rolling! The most popular way to roll sushi is by using a bamboo mat.
Here’s how: 1. Place the bamboo mat on top of a clean surface.
2. Take a sheet of nori and place it, shiny side down, on top of the mat. 3. Wet your hands with water to prevent rice from sticking to them.
4. Scoop about ¾ cup of rice onto the nori and spread it evenly, leaving about 1 inch at the top uncovered. 5. Add your fillings in a line across the middle of the rice.
6. Using both hands, lift up the bottom edge of the bamboo mat while holding onto the filling with your fingers. 7. Roll it over until it covers all of the filling and tucks in underneath on other side leaving about 1 inch uncovered at top still.
Tips for Creating Different Shapes and Sizes of Rolls
Sushi rolls can be made in different shapes and sizes depending on your preference. One option is to create “hosomaki,” which translates to “thin roll.” You can make these by spreading less rice onto each sheet of nori before adding fillings such as avocado or cucumber slices.
For larger rolls, try making “futomaki,” which means “thick roll.” These require more rice, so be sure to use enough when spreading onto each sheet of nori. Another option is making “uramaki,” also known as inside-out rolls.
These are created by placing the nori on top of plastic wrap instead of directly onto the bamboo mat before adding ingredients and rolling. To create unique shapes like triangles or hearts, use cookie cutters to cut out the sushi after it has been rolled and sliced.
Experiment with different shapes and sizes to find what works best for you and your guests. With a little practice, you’ll be creating beautiful sushi rolls in no time.
Cutting and Presentation
How to Cut Sushi Rolls into Perfect Pieces
Now that you’ve successfully made your own sushi roll, it’s time to cut it into perfect bite-sized pieces. A sharp knife is crucial for this step as it will help prevent the rolls from falling apart or looking messy. Use a long, thin-bladed knife and dip it in water between each cut to prevent the rice from sticking.
Begin by cutting the roll in half with one decisive stroke, then line up the halves and cut them in half again. Repeat until you have eight equal pieces.
If your rolls have a lot of filling, you may want to make thinner slices, so adjust accordingly. You can also create diagonal cuts for a more elegant look.
When presenting your sushi rolls on a plate or platter, arrange them in an attractive pattern. You can create a simple design by alternating rolls with different fillings or arranging them in a spiral pattern around a dipping sauce dish.
Creative Ideas for Presentation
Presentation is key when serving sushi – after all, we eat with our eyes first! Here are some creative ideas for presenting your homemade sushi rolls: – Serve them on bamboo mats lined with banana leaves or colorful paper doilies
– Place each piece of sushi on individual spoons for an elegant presentation – Create a unique centerpiece by arranging several different types of rolls on a wooden board or slate tile
– Play with colors by using brightly colored ingredients like pink pickled ginger, green wasabi paste, and orange tobiko (flying fish roe) – Use edible flowers like chrysanthemums or violets as garnish
Remember that presentation doesn’t have to be complicated – even simple arrangements can look beautiful if done well. Take some time to experiment with different plating techniques and find what works best for you!
Troubleshooting Common Problems
Sticky Rice
One of the most frustrating things that can happen when making sushi is when the rice sticks to everything – your fingers, the bowl, and even the mat. The good news is, this problem can be easily avoided. First, make sure to rinse the rice thoroughly before cooking it.
This will help remove excess starch and prevent it from sticking together. Secondly, use a non-stick pan or pot to cook the rice in, as this will make it less likely to stick.
Be sure to allow the rice to cool slightly before handling it. If you still find that your cooked rice is too sticky, try adding a bit more water next time you cook it or reducing the amount of vinegar in your seasoning mixture.
Another option is to use a bit of oil on your hands and utensils when working with the rice. Just be careful not to add too much oil as this can affect the taste and texture of your sushi.
Falling Apart Rolls
It can be disheartening when you’ve spent time carefully rolling your sushi only for everything to fall apart once you try cutting into it. This often happens because there isn’t enough pressure applied during rolling or because too much filling has been used. To prevent falling apart rolls, start by making sure that there is enough space at the top of each sheet of nori for you to seal it properly once rolled up.
Also, avoid overfilling each roll as this can cause them to split open while cutting them into pieces. When rolling up your sushi rolls with toppings inside them like shrimp tempura or avocado slices on top, apply gentle pressure during rolling especially towards these sides not filled with ingredients so they form a tight cylinder-like shape rather than a rectangle-shaped one which could lead to opening up while slicing.
Dry Rice
If your sushi rice is coming out dry and crumbly, it’s likely because you’re not using enough water when cooking it. Be sure to follow the instructions on the package or recipe carefully, and use the correct ratio of rice to water.
Another factor that can contribute to dry rice is overcooking it. Once the rice has finished cooking, be sure to remove it from the heat and let it sit for a few minutes before fluffing it up with a fork.
This will help prevent excess moisture from escaping and keep your rice nice and moist. Making sushi can have its challenges but with these tips for troubleshooting common problems like sticky rice, falling apart rolls, or dry rice, you’ll be able to overcome them easily.
Practice makes perfect so don’t be afraid to experiment with different techniques until you find what works best for you. Keep in mind that each small thing counts like rinsing your rice thoroughly before cooking or pressing gently when rolling up your sushi- every step matters when making delicious homemade sushi!
Conclusion
Encouragement to Try Making Your Own Sushi at Home
If you’ve made it this far into the article, hopefully, you’re feeling inspired to try making your own sushi at home. Don’t let the thought of making sushi intimidate you!
With a little bit of practice, you’ll be rolling up delicious and beautiful-looking rolls in no time. Remember that the key to success is preparation.
Make sure that you have all the necessary ingredients and equipment before starting. And don’t worry if your first few attempts don’t turn out perfectly – practice makes perfect!
Final Thoughts on the Benefits of This Fun Activity
Making your own sushi is not only a fun and creative activity but also has many benefits. Firstly, it’s a great way to save money since eating out at sushi restaurants can be costly.
Secondly, by making your own sushi, you have complete control over what goes into each roll so you can customize them according to your taste preferences or dietary restrictions. Making sushi is a great way to bond with family or friends.
It’s an interactive activity that encourages conversation and collaboration – plus everyone gets to enjoy the delicious fruits of their labor! So go ahead and give it a try – you might just discover a new hobby or passion for cooking!